This page is under construction.
Month: March 2013
Audio Tutorials
Welcome to the Remote Base
Important! We have released a new software client 6.20230. Please upgrade your existing software immediately to avoid lags in response time and to add CW filters and upgraded menus, plus an improved memories dialog.
Go to: W4MQ Software
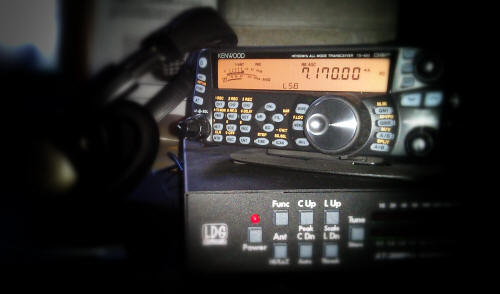
The W4MQ software is hosted at Handiham.org. It is free for anyone to download and use. Access to the two Handiham stations is available via GUEST login or Echolink for receive only. Transmit use is a Handiham member service. You may download and install the host software to operate your own internet remote base station. Continue reading Welcome to the Remote Base
Memories Dialog Box – How to Enter Memories
Memories Dialog Box Made Easy
by Jose, KK4JZX, & Pat, WA0TDA
This page contains an introduction with screenshots
and a detailed explanation for screenreader users.
All material is subject to change with ongoing software updates. We strive to make the software as easy to use and accessible as possible for all users.
Please let us know if something fails to work.
Introduction with screenshots
The Remote Base client provides capability to save your favorite stations to
memory for future use. You can bring up the help from within the Memory
Dialog or by going to the Handiham Help and Support Page.
To begin, open the web transceiver client. In this procedure, you do
not need to actually log on to station to populate the memory slots, but you do
need to start the software and use the pull-down menu to choose a station.
In this setup I have chosen W0EQO.
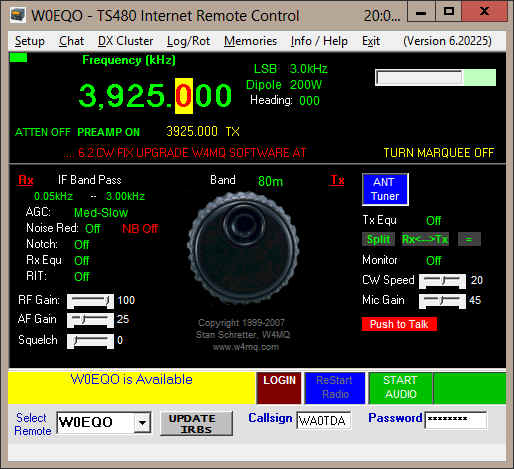
Next, I want to choose the frequency to save into memory. In this case,
I want to set a memory to 3.925 MHz, where one of my 75 meter nets meets. I also
select LSB and the desired power setting. All of this can be done without
actually being connected to a live session with the radio.
With the frequency and mode set, it is now time to click on
“Memories” in the menu bar. If you use keyboard shortcuts, the
combination is ALT-M.
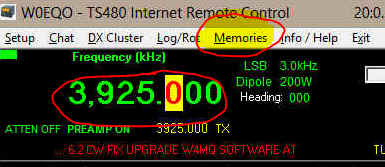
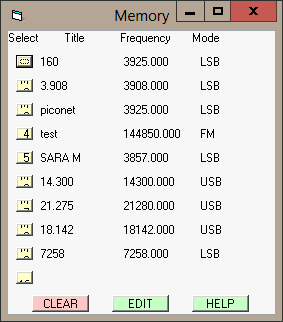
This brings up the Memories Dialog. Click the EDIT button to
proceed.
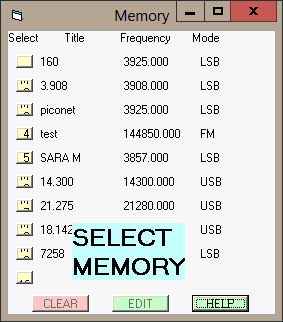
Clicking the EDIT button has brought up a SELECT MEMORY message. Pick the
memory slot you wish to populate or change by clicking the button corresponding
to the memory you wish to use.
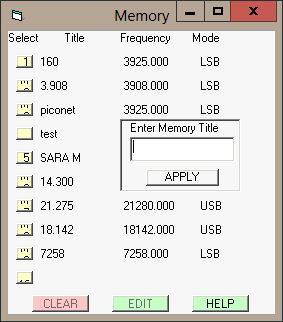
As soon as you click a memory button, a field appears that is labeled
“Enter Memory Title”. You can label this whatever you want, such
as “My Net” or “75m” or “3.925 MHz”. I
have chosen “New Test”, because I am just running a test to show you
how this works. As soon as I have entered the label, I can click APPLY.
Now the Memory Dialog may be closed with the “x” in the upper right
corner, or you may select one of the memory buttons.
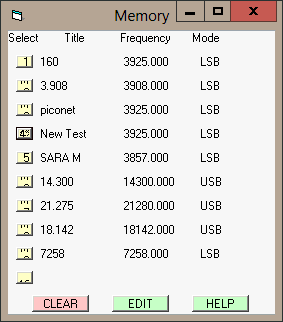
In the previous screen, I noticed that memory 1 is labeled incorrectly.
It says “160”, when the actual frequency is 3.925. I can fix
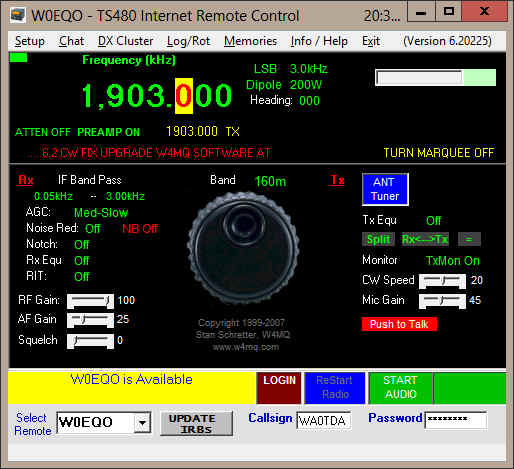
this by going back to the client interface, making sure the radio is set to
1.903 MHz, my desired 160 meter frequency, and repeating the process.
Here I have selected the frequency and mode, 1.903 MHz and LSB.
I bring up the Memory Dialog again:

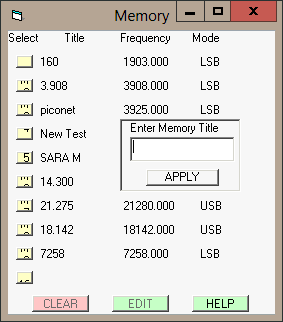
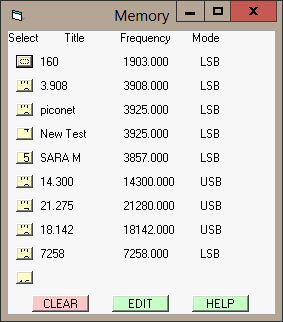
I choose EDIT, select memory 1, and bring up the labeling dialog. The
frequency in memory slot 1 has now changed to 1.903 LSB. In the Title
column, I see that my existing label, “160”, is just fine, so I need
not enter anything into the “Enter Memory Title” field, which I can
just leave blank. Hit APPLY and the memory is saved with the correct
information.
Detailed explanation for screenreader users:
For JAWS® or other screenreader users, the Memory dialog is laid out as follows:
When you first launch the Memory dialog, you are presented with 10 memory slots, one CLEAR button, one EDIT button, and a HELP button. There is an additional button that is added when the EDIT button is selected. As you TAB around the interface, you are taken from Memory slot to memory slot (M1 through M10). In addition to the memory slot name, you will hear your screen reader announce the name of the memory you have assigned if you have done so prior. You will also hear which memory is selected as the name is announced with an asterisk. For example, you might hear M1 *
PICONET button if Memory Slot 1 has already been used to save the PICONET as a favorite. For sighted folks, the interface might present some challenges but, with this documentation, the process is made clearer. The Memory Dialog box has the capability to store 10 Memories, as mentioned above. Each memory slot has a corresponding button all the way to the left of the interface. There is a memory title and all the other information associated with the memory.
Very Important things to know about the Memories dialog box:
1. If you enter the memory dialog for the first time, the list will not be populated with any memories.
2. When you want to save a memory location, you must first click on the Edit button before you click on the memory slot you want to save. This will become evident because when you do click on Edit, the only options will be the Help button and the 10 memory location buttons.
3. For Screen reader users, clicking on the Edit button will move focus to the Help button and you must tab over to the memory you want to change and then activate the button for that memory.
4. IF you want to clear a memory slot, you will need to first click on the clear button before clicking on the memory slot you want to have cleared. The Clear button will disable the Edit and clear buttons until you click on the memory location you want to clear. At that time, the memory location is cleared and the buttons for Edit and Clear are re-enabled.
5. If you have already saved memory slots and you want to use one, simply click on it and you will be taken to the main radio interface with your memory loaded up with all the settings you chose when you saved it prior.
6. When you click on the edit button and then you choose a memory location to edit, you will be asked to give the memory location a friendly name. At this time, you can type the friendly name for the location and then tab over to or click on Apply.
Saving your favorite stations to memory is easy; just use the following steps:
1. Sign in to the remote base with valid credentials. This means that you have connected to the band that you want to save and you are hearing the radio.
2. Select all the settings that you would like to have the remote base client store for your particular favorite station. This might include Frequency, Mode, Split or simplex mode, and so on.
3. Please note that the radio’s audio may interfere with your hearing of the screen reader. IF you are using Windows Vista or above, and you know how to perform the steps, you might be able to turn down the volume for Skype or IRB sound. If you are using Windows XP, please use the following steps for temporarily changing the RF gain:
a. Press the letter G for RF Gain
b. Use the less than or greater than sign on the keyboard to lower and raise the RF gain respectively. The less than sign is also the comma character on the keyboard and the greater than sign is also the period key on the keyboard.
4. From the main Remote Base client interface, choose the Memories menu or press ALT+M. You will note that the following dialog will appear.

5. You may tab around this interface and, if you are using a screen reader, you will hear the memory title you have saved as you tab from slot to slot. What you will hear is M1 through M10 with the title of the memory that you previously saved. In addition, the selected memory will be indicated by an asterisk. For example, if you saved the
PICONET on memory slot 1, you will hear:
M1 * PICONET Button
6. If you have no memory saved in a slot, and you are using a screen reader, you will hear the Memory slot with the word NO_KEY announced as well. NO_KEY means the memory has not yet been saved.
7. When you get to Memory slot 10, M10, then you have three additional buttons labeled Clear, Edit, and Help.
8. Click on or Tab to the Edit button and activate it. Important: you must click on the Edit button before activating a memory slot for saving. The Save button will become disabled temporarily until you apply your changes. The Clear button is also temporarily disabled until you have completed your save action.
9. Now tab over to the memory slot that you want to choose and activate it. You will be taken to a Memory Title field in which you may enter a friendly name to use for the memory that you are saving.
10. Enter a name for the Memory slot and tab over to the Apply button and activate it.
11. The memory will be saved and you are returned to the memory slot you just saved.
12. Important note: If you want to continue saving memories, click or ALT+TAB to the main radio interface and select a new band. You can then start from the top of these instructions to continue saving new memories.
To Clear a Memory Slot, do the following:
1. Launch the remote base client.
2. From the menu, choose Memories or press ALT+M to bring up the Memory dialog box.
3. Click on the Clear button or simply tab over to the Cleared button to activate it using a screen reader. TIP: if using a screen reader, you might find that you will get to the clear button quickly by hitting SHIFT+TAB instead of TAB all the way through the ten memory locations.
4. Now that you have enabled the clear function, click on the button for the memory slot that you want to clear. If you are using a screen reader, simply tab over until you hear the memory slot you want to cleared and activate the button. Note that when you activate the clear button, you won’t be able to click on it again until you actually click on the memory you want to clear. Additionally, while in clear mode, you are not allowed to edit any memory slots.
5. AT this time, you are taken back to the memory slot that you just cleared and you will know which one it is since it is indicated by a memory number + an asterisk and the generic NO_KEY description.
6. You may now continue working with the memory dialog until you are done.
7. Close the memory dialog by pressing ALT+F4 or by choosing one of your saved memories.
TIP: If you need help with the memories dialog, then click on the HELP button or tab over to it to bring up the web site that contains the help information for saving and clearing memories or even activating memories.
What are the settings that are stored when a particular band is saved?
When a band is saved locally, you may save all the following settings with the
memory:
AGC
Amplifier
Azimuth
Compression Level (comp level)
Compression
CW Key Speed
DIG Gain
Filter
IF Shift
MIC Gain
Noise Reduction
Notch
NR Level
Power Level
Preamp
RIT
RX Antenna
RX Equalizer
RX frequency
RX Mode
Simplex
Memory Title
TX Equalizer
TX frequency
TX mode
Volume
VOX
We hope you find this information useful.
73,
Patrick Tice, WA0TDA
Handiham Manager
JAWS is a registered trademark of Freedom Scientific.
Learn more about screenreader JAWS here.
Memory Dialog Development
What is this memory dialog that we are putting together with the new Web Transceiver software? Continue reading Memory Dialog Development
Entering Memories
Memories Dialog Box Made Easy
The Remote Base client provides capability to save your favorite stations to memory for future use. You can bring up the help from within the Memory Dialog or by going to the handiham Help and Support Page. For JAWS® users, the Memory dialog is laid out as follows.
Setting the RF Gain
Want to set the RF gain? Here are the steps. Continue reading Setting the RF Gain
Handiham Remote Base shows online in W4MQ but Skype shows it as offline, why?
Folks, we have had this question and wanted to provide an answer. Continue reading Handiham Remote Base shows online in W4MQ but Skype shows it as offline, why?
What have we been working on? New functionality to save your favorites!
We are working on enhancing the remote base client even further folks! Continue reading What have we been working on? New functionality to save your favorites!
Only licensed amateur radio operators may subscribe
We welcome licensed amateur radio operators as subscribers. Continue reading Only licensed amateur radio operators may subscribe
